Saturday, August 03, 2019

Violin, personal "Del Gesù" (a new attempt at this model)

I made another violin on my "personal Guarnerius" pattern.
This mould gives a 353-354 mm length of back, measuring along the arching (flexible tape).

This latest instrument has an oil varnish finish with no antiquing, over a "mineral ground" coat, obtained by mixing some finely crushed volcanic matter (pumice, pozzolana) into a basic oil varnish.

The pictures were taken before doing the final smoothing and polishing; I did this with tripoli and oil on a cotton rag, then with some diluted "Super Nikco" commercial polish  (I find that Super Nikco is too aggressive, even for a new instrument, but it is very efficient in leaving an oil-free surface).


The scroll pattern is derived from an instrument by Del Gesù that was in Ruggiero Ricci's collection. I remember that it was an instrument from the maker's early period, and it does not have the characteristic bulbous shape. The inner turns of the scroll follow the Rocca model, a rationalised and recognizable interpretation from one of the most important Italian makers and copyists, that I am trying to grasp and internalize.


Here are some details of the unpolished varnish coat and corners, etc...


I will return to the Rocca 1854 pattern for my next instrument, and I will see if I can incorporate my new findings into a better rendition of this beautiful model.


Monday, July 15, 2019

Spiral bushings

I installed spiral bushings on an old Sicilian violin. The D peg has also been regularly bushed and reopened beforehand, in order to drill the new hole in line with the other three.

I made a special gouge to ease the trimming of the bushings, by cutting and grinding an edge to an old file. The back of this gouge has a slightly curved surface, much like a so-called "in-cannel" gouge.

 I did a very light reaming of each hole before glueing two maple shavings on each hole. After the needed thickness was reached, I glue-sized and scraped the shavings flush with the pegbox walls. Then I did the varnish retouching and a very light French polishing. The retouch adds a slight halo around the peg holes, which simulates the dirt accumulation and helps to hide the repair. In the pictures (taken with my phone) the varnish retouch looks more opaque than it really is.
Finally, the old pegs have been thinned down on the peg shaper and reinstalled.


Sunday, November 04, 2018

Violin after a Joseph Rocca "Guarnerius" pattern

This is a violin I finished in October 2018.

It is made after a Joseph Rocca "Guarneri" violin made in 1854, and here's a little bit of explanation about why I chose this specific model.

The first time I used the "Alard" Rocca pattern, I was working under the guidance of master violinmaker and expert Eric Blot, in Cremona. As a freshly graduated student from the Cremona school, I had the opportunity to make a violin for Eric's workshop, since Eric was launching a "mid-price" line for his customers at that time.
Contrary to what was the common practice in town, not only was I allowed to copy his patterns and plaster casts from an original Joseph Rocca violin, but I also received help by Eric's assistant, Jan Bartos, and by Eric himself, in all the most important steps of the making. I remember Eric being very busy with the writing of his book about Piedmontese makers at that time.

After the violin was finished in white, it was Jan who varnished and set it up, because I wasn't ready to do that with the quality that Eric wanted... this doesn't mean that Eric and Jan wanted to keep it all secret, we talked about oil varnishes, lakes and rosinates quite a bit and all this information turned out to be very useful in the following years.

Eric's choice to put the apprentice's name on his workshop labels was not very common in Cremona, and it is one I appreciated very much.
More recently, I had the chance to trace the present owner of the violin via a casual encounter. I don't have any good pictures of it, unfortunately.


the violin was made after the patterns I received from Eric Blot, I just made the corners slightly longer than the original. The strong, individualistic character of  J. Rocca's scrolls has always been the most difficult part to copy for me, but I tried to reproduce all the aspects that I could remember. I have used my own oil-based varnish for this one -- a yellow ground coat made by adding aloe resin to a basic colophony/mastic varnish, and four more coats of a similar orange-amber colored varnish, containing amber (indeed) and a bit of red madder lake.


Dear Eric, if you ever read this, let me say "thank you" for all you have taught me in your workshop!  I hope that I'll be able to come by soon with another instrument, and show it to you.

Wednesday, September 26, 2018

Violin, personal pattern after Guarneri del Gesù

This is a violin I made on a personal pattern in the style of Guarneri del Gesù.
The body length is 352 mm. Stop is set at standard 195 mm.
The varnish is an antiqued spirit lacquer.


Tuesday, September 25, 2018

C Extension for Double Bass

I made this C extension for a contemporary bass by Ezio Scarpini.


For this job, I followed the detailed instructions written by William Merchant in the famous book "The Setup and Repair of the Double Bass for Optimum Sound" (Chuck Traeger, with David Brownell and William Merchant, printed by Henry Strobel, Aumsville Oregon 97325 USA, 2004 - ISBN 1-892210-06-1, pp. 360; a recommendable book for all bass repairers and builders). For some aspects of the work, I followed my taste and some constraints imposed by the particular instrument. All parts were made in my workshop. My intern student Satoko Aihara contributed in the initial steps of the making, and helped me gather many hints and examples on Japanese blogs and specialized websites.


A 4-string double bass with a C extension can be used in the orchestra in place of a 5-string bass, and for this purpose a special, longer 4th string is mounted on the instrument. In this instrument, the new upper nut is placed 27 centimeters past the old upper nut (which is cut between the 3rd and 4th) on the extended fingerboard. This will give the low C. The string runs over the nut into the throat of an aluminum 1" wheel (I used a wheel from a sailing hardware store), makes a turn, goes into a hole drilled into the scroll and reaches the A string tuning gear, while the 3rd string is mounted on the E gear. The player can use the "E stop", placed on the side of the original nut, to block the string to the original tuning. The other three keys are used to set the low string to C#, D, D#  on convenience. The player can set the most convenient stop during playing and finger the notes on the extended fingerboard by placing the thumb on its underside, which has been made smooth and concave.


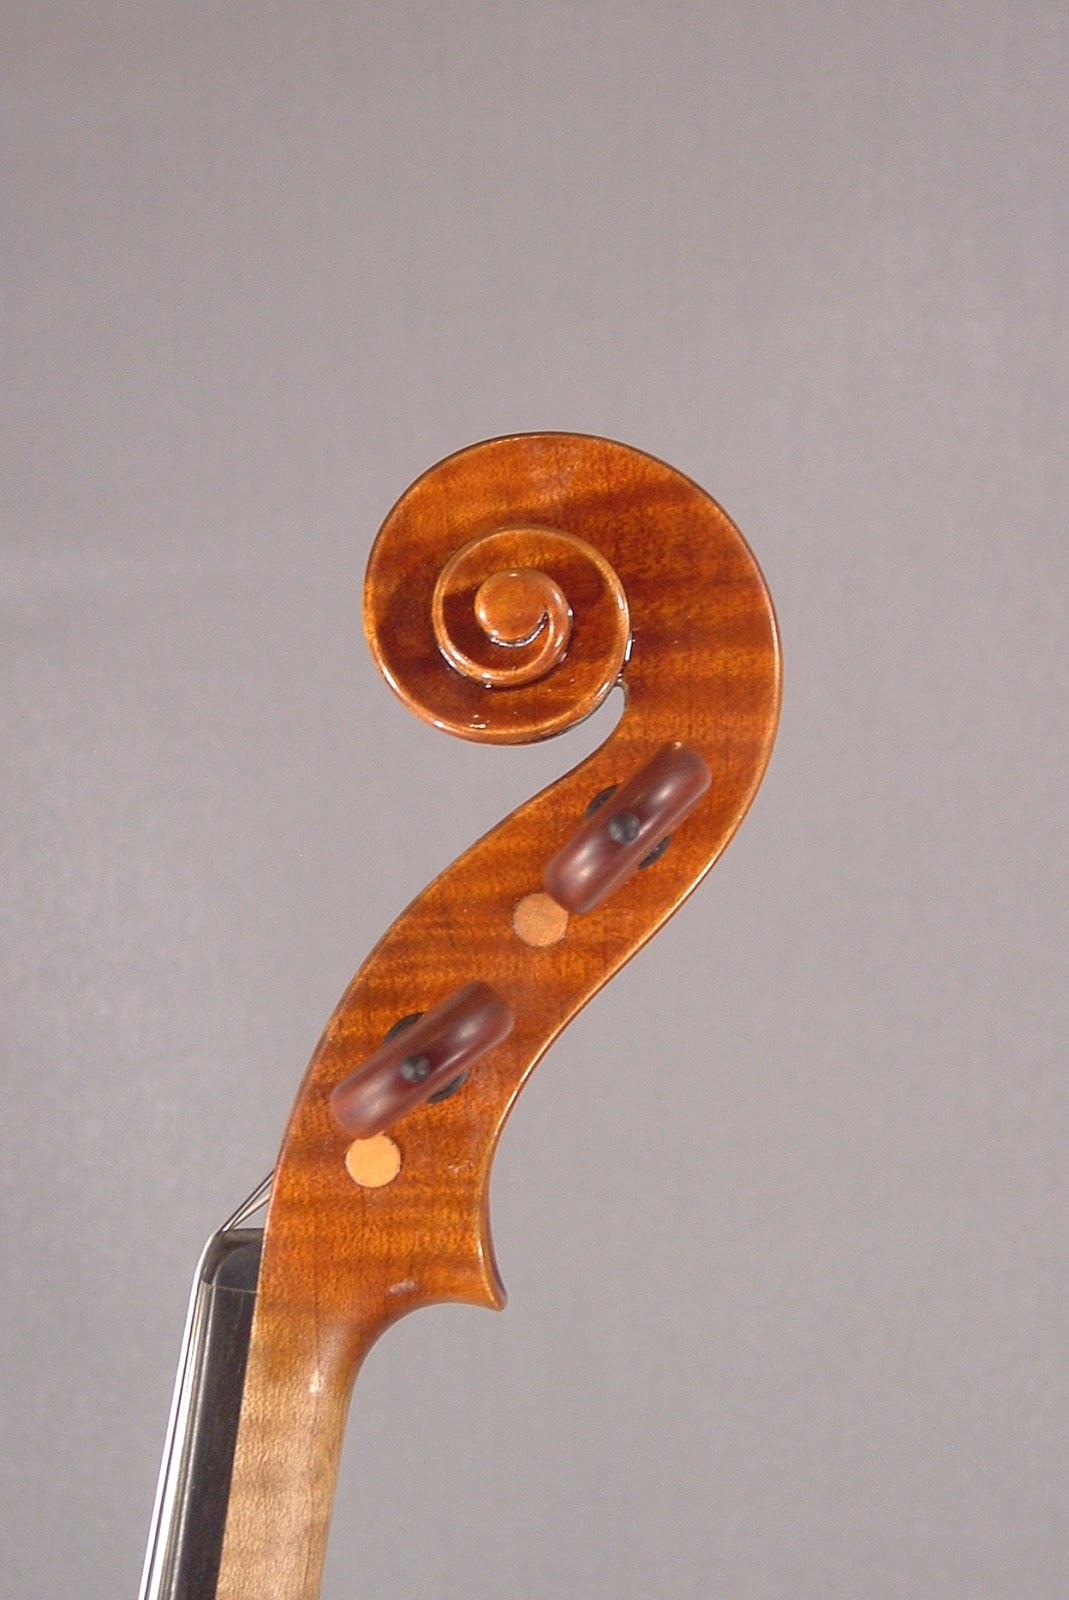
The geometry of this neck and scroll dictated some choices in the making. First of all, in this instrument, the line projecting from the fingerboard base almost hits the scroll. This means that, in order to have a normal thickness for the extension at this point, and an easy to finger 4th string, I decided to make the extension out of a single piece of ebony, rather than a separate ebony fingerboard on top of a maple piece. Having a little distance from the fingerboard surface to the pegbox walls, prevented me to install a second wheel to make the 4th string reach the usual (lowest) tuning gear; I chose to follow the common method of bringing the string to the 3rd gear.


The ebony block has been fitted precisely to the pegbox walls and the scroll face, and it is secured in position with two screws. The upper face has been planed and sanded in the right shape so that it is a perfect extension of the fingerboard's shape, and the string doesn't buzz on it when playing with a bow.
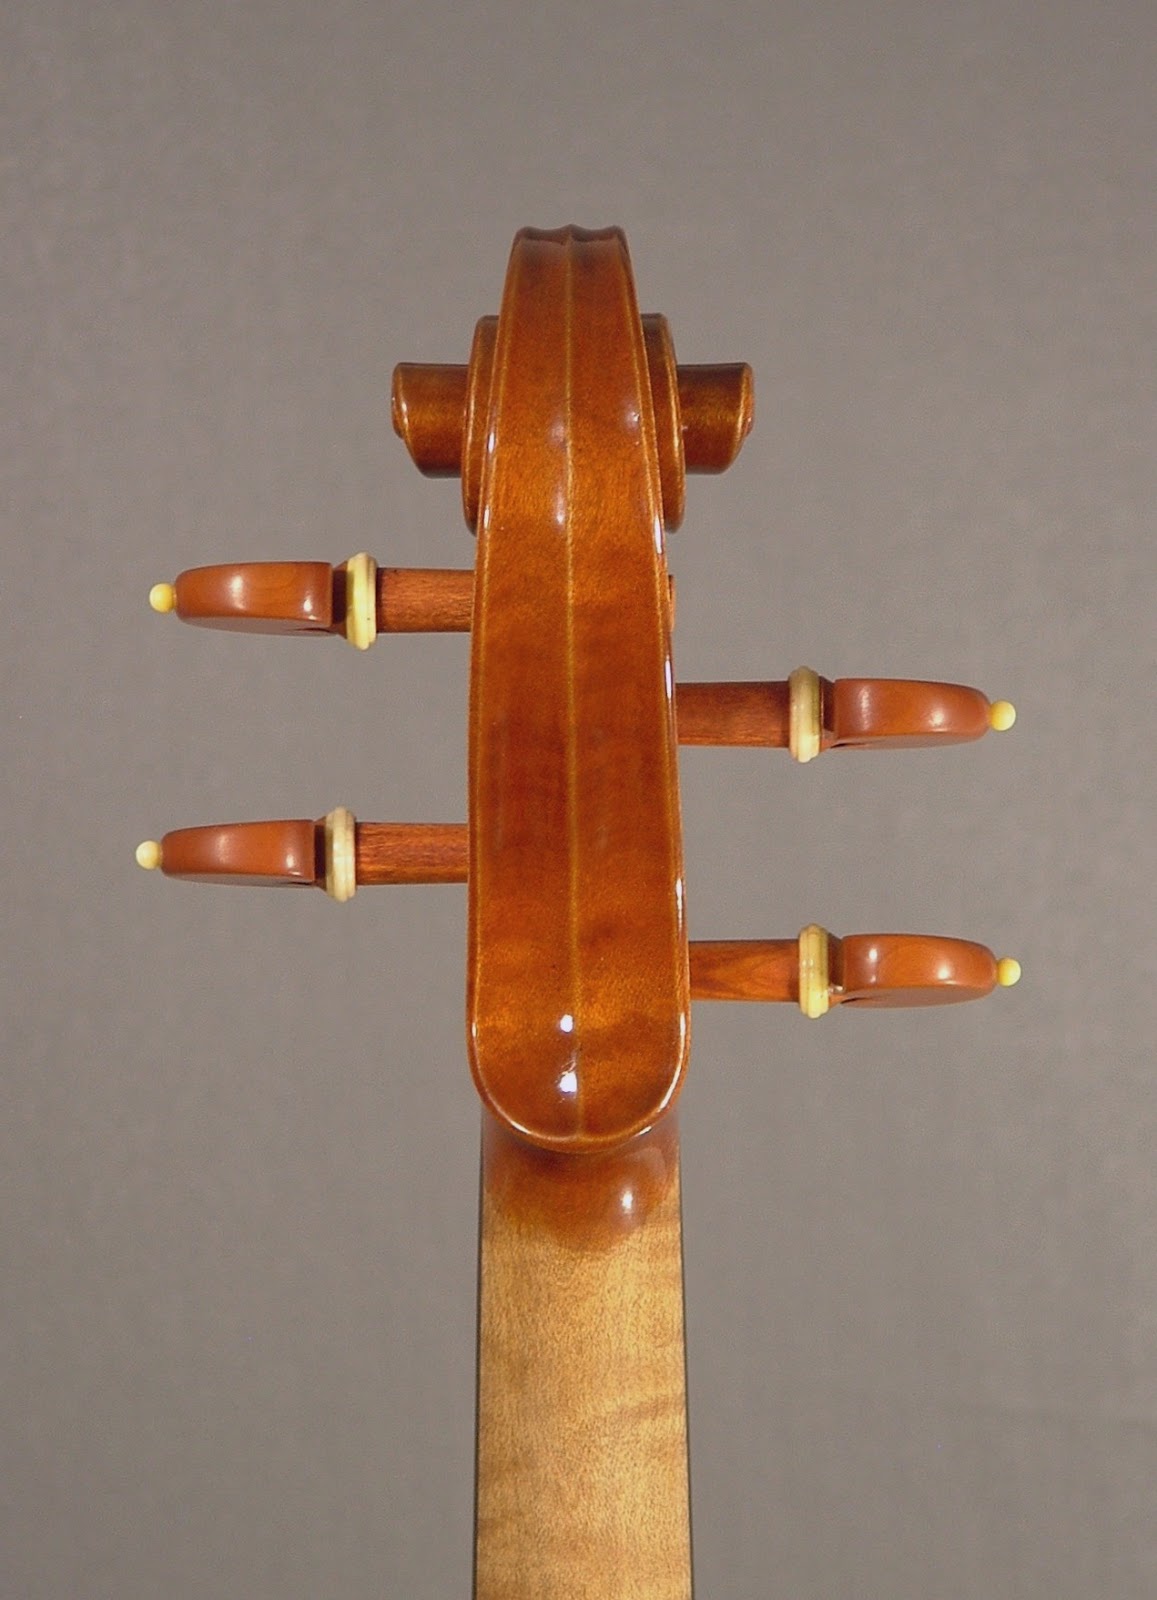
For the keys, I tried to design a shape that makes them easy to move into and out of position, without making them looking too slim nor too bulky. At first, I wanted to copy the ones from a Japanese bass extension, which shape reminded me that of a duck's beak. But, it seemed to me that they may be too low for the player's fingers to unlock them easily, so I designed my own shape. They can be reminiscent of the lines of the bow frogs, since they have a curved part towards the string and a concave "cheek" on the opposite part. A small square of leather completes the key's working surface. In order to prevent excessive friction, I have put a small plastic washer between the key and the supporting plate. The brass screw is held by the threaded plate and the serrating force has been set with the aid of a "blind" nut and two drops of thread glue.


The three upper keys are supported by brass plates blocked in position by screws on the flat outer side of the extension. Since there is little wood thickness for the D# extension, I had to change the shape of this plate. This one has a "tongue" extending into a small rectangular cut that I filed into the extension, secured with three small screws, and a supporting base (without screws) that sits onto the pegbox wall and (partially) on the extension side. This prevents the thin brass tongue from bending when the key is closed.


Here are the four keys; all have a 10° skew from the perpendicular axis to the extension surface.
The "E stop" has been mounted on a brass strip, secured to the neck and running on the underside of the original nut, which has been reduced in height, as in the Chuck Traeger's method.
All the keys can be operated with the left hand, without having to hold down the string, and the height of the 4th string with all keys opened, taken at the original nut position, is about 5 mm.


This was quite a complex and demanding job for me, and perhaps the most difficult single job I had to do on a double bass. I am happy that it's working fine!

Wednesday, August 15, 2018

Violin peg shaper DIY

I made a "custom" violin peg shaper for my workshop some years ago. I had an "Officina Claudio Monteverde" violin in the workhop which needed a new set of pegs. I noticed that the pegholes had a non-standard conical ratio so I decided to buy a so-called "irregular" peg reamer and make my own peg shaper out of a piece of suitable wood.

 I chose a piece of a hard, slightly oily wood that I believe comes from Australia. I cut it out of a plank used for flooring.

For the cutter, I used a spare Stanley iron, which had the correct width and fastened it to the peg shaper with a threaded rod and a knurled wheel.
The metal is not as hard as regular peg shaper cutters, but it's much easier to sharpen. I use a 40° grinding angle.
A good improvement would be the placing of a reinforcement on the side opposite the edge of the iron.
I am planning to make another one with a larger diameter and regular shape, and use it to shave down the sticks that I use for bushing pegholes (Done - outer diameter 10mm)


Bow frog - simple repair

This cello bow frog by Emilio Slaviero is decorated with an oval mother-of-pearl inlay. The inlay has been worn out completely by the player's hand perspiration and needed replacing.


The old inlay was unglued with the aid of a solvent; acetone worked well.
I selected a suitable piece of new mother-of-pearl and sawed out the oval piece with a jeweler's saw, then I finished the exact shape with files.
The new inlay was glued in with cyanoacrilate and filed down following the concave shape of the frog. Finally, the area was finished with a felt wheel and a fine rubbing compound made by the Menzerna firm.